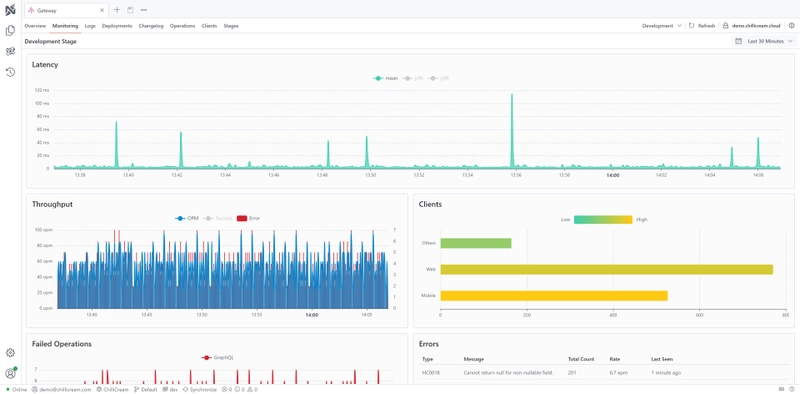
Fusion, can be seamlessly integrated into your DevOps processes using Nitro. Nitro acts as an orchestrator for your Fusion gateway, deeply integrating with your development workflow. It enables you to publish, validate, consume, and monitor your Fusion gateway efficiently.
This section provides a comprehensive guide on how to integrate Fusion with Nitro into your DevOps pipeline, covering gateway and subgraph configuration, CI/CD integration, monitoring, and caching.
Overview of Nitro and Fusion
Nitro enhances your Fusion gateway by:
- Automating configuration updates.
- Validating schema changes against client applications.
- Providing a dashboard for monitoring your gateway and subgraphs.
- Enabling distributed telemetry for performance insights.
- Offering caching mechanisms for improved resilience.
By integrating Nitro with Fusion, you can streamline the management and deployment of your federated GraphQL services.
Setting Up the Fusion Gateway with Nitro
1. Install the Nitro Package
To integrate your Fusion gateway with Nitro, install the ChilliCream.Nitro.Fusion package:
dotnet add package ChilliCream.Nitro.Fusion
2. Configure the Gateway Services
In your gateway's startup configuration, set up the services to connect with Nitro:
builder.Services .AddFusionGatewayServer() .ConfigureFromCloud(options => { options.ApiKey = "<<your-fusion-api-key>>"; options.ApiId = "<<your-fusion-api-id>>"; options.Stage = "dev"; // Replace with your stage });
Tip: Using Environment Variables
NITRO_API_KEYforApiKeyNITRO_API_IDforApiIdNITRO_STAGEforStage
Then, configure the gateway without explicit parameters:
builder.Services .AddFusionGatewayServer() .ConfigureFromCloud();
3. Enable Telemetry and Instrumentation
To monitor your gateway, enable instrumentation and configure telemetry export to Nitro:
builder.Services    .AddFusionGatewayServer()    .ConfigureFromCloud()    .CoreBuilder    .AddInstrumentation();
builder.Services    .AddOpenTelemetry()    .WithTracing(builder =>    {        builder.AddHttpClientInstrumentation();        builder.AddAspNetCoreInstrumentation();        builder.AddNitroExporter();        // Add additional instrumentation as needed    });
This setup allows your gateway to send telemetry data to Nitro for monitoring and analysis.
Configuring Your Subgraphs with Nitro
To integrate your subgraphs with Nitro and the Fusion gateway, follow these steps:
1. Install the Nitro Package in Subgraphs
In each subgraph project, install the ChilliCream.Nitro package:
dotnet add package ChilliCream.Nitro
2. Configure Services in Subgraphs
In the startup configuration of each subgraph, set up the Nitro services and enable instrumentation:
services    .AddGraphQLServer()    .AddQueryType<Query>()    .AddNitro(options =>    {        options.ApiKey = "<<your-subgraph-api-key>>";        options.ApiId = "<<your-subgraph-api-id>>";        options.Stage = "dev"; // Replace with your stage    })    .AddInstrumentation(); // Enable GraphQL telemetry
services    .AddOpenTelemetry()    .WithTracing(builder =>    {        builder.AddHttpClientInstrumentation();        builder.AddAspNetCoreInstrumentation();        builder.AddNitroExporter();        // Add additional instrumentation as needed    });
3. Create Subgraph Configuration File
Each subgraph requires a subgraph-config.json file in the project's root directory:
{ "subgraph": "Order", // Name of your subgraph "http": { "baseAddress": "http://localhost:5000/graphql" // Update as necessary }, "extensions": { "nitro": { "apiId": "<<your-subgraph-api-id>>" } }}
This file is essential for the Fusion gateway to recognize and connect to your subgraphs correctly.
Integrating Nitro and Fusion into Your CI/CD Pipeline
Automate the deployment of your Fusion gateway and subgraphs by integrating Nitro into your CI/CD pipeline.
1. Install Nitro CLI and Fusion Command Line Tools
In your CI/CD environment, install the necessary command-line tools:
dotnet new tool-manifestdotnet tool install ChilliCream.Nitro.CLIdotnet tool install HotChocolate.Fusion.CommandLine
2. Pack the Subgraph
Before deployment, pack your subgraph to create a package containing the schema, extensions, and configuration:
dotnet run -- schema export --output schema.graphqldotnet fusion subgraph pack
This step is typically part of your build process in the CI/CD pipeline.
3. Coordinate Deployment Slots with Nitro
To manage concurrent deployments and avoid conflicts, use Nitro to coordinate deployment slots:
dotnet nitro fusion-configuration publish begin \ --stage <<stage-id>> \ --tag <<tag>> \ --api-id <<your-fusion-api-id>> \ --subgraph-name <<subgraph-name>> \ --api-key <<your-fusion-api-key>>
This command registers your intent to deploy and waits until it's your turn.
4. Start the Deployment
Once you have a deployment slot, confirm your deployment:
dotnet nitro fusion-configuration publish start --api-key <<your-fusion-api-key>>
5. Configure the Subgraph URL
Set the environment-specific URL for your subgraph:
dotnet fusion subgraph config set http \ --url <<your-subgraph-url>> \ -c path/to/your/subgraph/config.fsp
6. Compose the Gateway Configuration
Fetch the latest gateway configuration and compose it with your subgraph:
dotnet nitro fusion-configuration download \  --api-id <<your-fusion-api-id>> \  --stage <<stage-name>> \  --output-file ./gateway.fgp \  --api-key <<your-fusion-api-key>>
dotnet fusion compose -p ./gateway.fgp -s path/to/your/subgraph/config.fsp
7. Validate the Configuration (Optional)
Ensure your changes won't break existing clients or introduce conflicts:
dotnet nitro fusion-configuration publish validate \ --configuration ./gateway.fgp \ --api-key <<your-fusion-api-key>>
If validation fails, cancel the deployment:
dotnet nitro fusion-configuration publish cancel --api-key <<your-fusion-api-key>>
8. Deploy the Subgraph
Deploy your subgraph to your infrastructure using your standard deployment tools.
9. Commit the Deployment
After successful deployment, commit the configuration to notify Nitro and update the Fusion gateway:
dotnet nitro fusion-configuration publish commit \ --configuration ./gateway.fgp \ --api-key <<your-fusion-api-key>>
This finalizes the deployment and allows the gateway to pull the latest configuration.
Monitoring and Telemetry with Nitro
Nitro provides monitoring and telemetry capabilities for your Fusion gateway and subgraphs.
Checkout the Nitro Distributed Telemetry documentation for more details.
Implementing Caching with Nitro
Nitro offers caching mechanisms of persisted operations and configurations to improve system performance and reduce dependencies on real-time server communications. Using the cache is considered a best practice.
File System Cache
The default caching mechanism uses the file system.
services .AddGraphQLServer() .AddFileSystemAssetCache(options => { options.CacheDirectory = "cache"; // Specify your cache directory });
Azure Blob Storage Cache
For distributed caching across multiple servers, use Azure Blob Storage.
Install the ChilliCream.Nitro.Azure package:
dotnet add package ChilliCream.Nitro.Azure
services .AddGraphQLServer() .AddBlobStorageAssetCache(options => { options.ContainerName = "your-container-name"; options.Client = new BlobServiceClient( new Uri("https://yourblobstorage.blob.core.windows.net/"), new DefaultAzureCredential()); });
Custom Caching Implementations
Implement the IAssetCache interface for custom caching strategies tailored to your specific needs.
